While latchcfg works in both ECWolf and LZWolf, the latter offers an alternative called sbarprot that allows for advanced statusbar/HUD customization. Using sbarprot, displaying information typically on the statusbar is a lot more flexible than utilizing the latchcfg method.
This guide will take you through how sbarprot works, and some example changes that can be made using it.
You can see the example version of sbarprot that displays the Wolfenstein 3D statusbar here. Make sure to look it over before proceeding!
The first thing that gets defined is the HUD location itself. To do this, we create an origin element.
origin 1
{
     x = 0;
     y = 160;
}
This is where elements of the statusbar or HUD will go, and inside it we tell the game where the starting x and y co-ordinates will be. A literal "origin point".
Inside of the initial origin element will go anything to be displayed related to the statusbar or HUD. These are referred to as child elements, and defined with the following structure
    child TYPE
    {

    }
statbarprot iterates through the list of child elements, drawing each in order of appearance. If two elements are drawn in the same location, the later entries will appear on top of the others.
These elements can be defined as either
pic (It displays an image at the location)
digits (Numbers such as what is used to display health and ammo)
origin (A new origin point for the HUD)
If you wanted to display a statusbar image like in Wolfenstein 3D, you would want to add a child pic element at the top of the origin element.
origin 1
{
    x = 0;
    y = 160;

    child pic    // The element being created
    {
        graphic_source = "TEXNAME";
        texname = "STBAR";            // The name of the statusbar image to be displayed.
    }
}
This will display the statusbar image, at the core origin co-ordinates. Since it's the first thing defined in our origin element, anything else added afterwards will be drawn on top.
texname refers to the strings assigned to images and sounds within the game (These can be found in lzwolf.pk3, in the XXXmap.txt files).
Creating elements that display numbers (Such as health and ammo) requires a little more information.
Let's look at the scripting required to display the amount of health the player has. The first layer looks as follows
    child origin
    {
        x = 168;
        y = 16;
    }
As the numbers for the statusbar are also images, they need to know where to be displayed. To accomodate that, this new child element is defined as an origin, and has it's own set of x and y co-ordinates. Being a child element, the co-ordinates are cumulative (They add onto the parent co-ordinates).
So in the above case, the co-ordinates are already set to '0' and '160' as defined in origin 1, then they add on another '168' and '16' to know where on the statusbar the HEALTH display should be.
If you neglect to declare co-ordinates for the child origin, it will simply use those that were originally declared.
Once the co-ordinates are set, we treat this child element as we did origin 1, and call additional child elements withinit that will display at these new coordinates. Since we are displaying the numerical value for HEALTH, the new child is defined as digits.
    child origin
    {
        x = 168;
        y = 16;
        child digits
        {
            value_source = "HEALTH";
            digits = 3;
        }
    }
Inside of this new child digits element, we've called two things; the value_source and digits. There are several default values for value_source
FLOOR_NUMBER
SCORE
LIVES
HEALTH
AMMO_PRIMARY
AMMO_SECONDARY (Having alternate ammo requires more changes to work, and is not covered in this guide.)
INVENTORY
While these are the defaults, you can always have a custom value for value_source, which you would then define the conditions of. We'll look at that later in a later step.
digits naturally refers to the maximum amount of digits that comprise the displayed value. As health can go as low as 0 and as high as 100 by default, the value of digits above is 3. As another example, score can display all the way to 999,999. As such, the digits value for SCORE would be '6'.
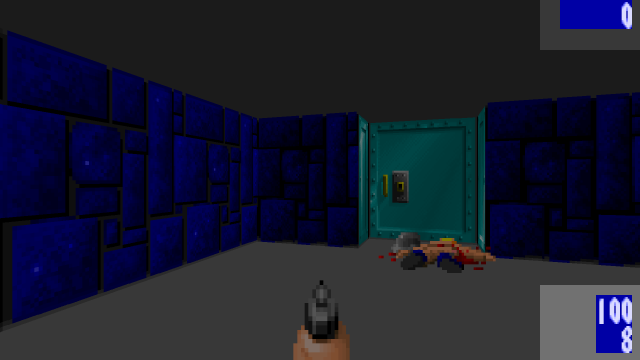
All together, our current sbarprot should look as follows (Displaying just the statusbar image, and player's health).
origin 1
{
    x = 0;
    y = 160;

    child pic    // The first thing being drawn - usually the statusbar/background
    {
        graphic_source = "TEXNAME";
        texname = "STBAR";    // The name of the statusbar image to be displayed.
    }
    child origin
    {
        x = 168;
        y = 16;
        child digits
        {
            value_source = "HEALTH";    // The statistic/value being displayed
            digits = 3;    // The maximum number of digits to be displayed
        }
    }
}
Using the above system of origin and child elements, you can recreate the original statusbar easily and modify it from there. There's a complete example version linked at the top of this guide, which you can find here for convenience.
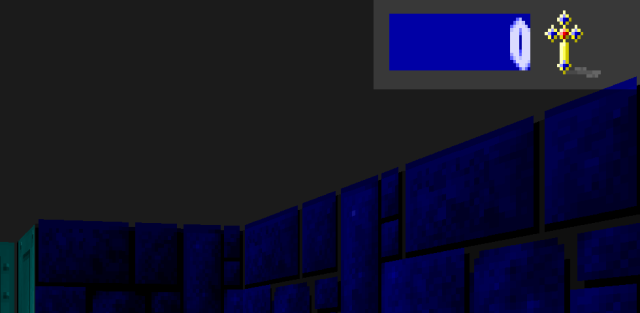
As you can see, we're introduced to two more child elements; has_key and logical_not.
has_key is a check that the user has the specified key (In this case, 'keynum = 1'. The gold key is '0'), and if it returns 'true' (The user has the key) then the scripting within it is initiated. In this case, a child pic element displaying the image of the key on the HUD is drawn.
logical_not is a parent element that will check for FALSE statements. It will look at the next check (In the case of the above code, another call to has_key), and if it is NOT true, then the script within is initiated. In this case it displays a blank space when the player DOES NOT have the key.
Let's say you wanted to display a fullscreen HUD that displayed without a statusbar.
We'll look at constructing an example that displays score at the top-right of the screen, with health and ammo displayed at the bottom-right.
First, we'll define the location of the HUD area. To do this, we'll create an origin element.
origin 1    // Our new HUD location
{
    x = 320;
    y = 0;
}
We have told the game to consider the HUD to be located further right, but at the very top of the screen.
Now, we'll define the child element for the score. We do not need to add a childpic element at the top like previous, since we are drawing the HUD elements directly on the player screen instead of having a statusbar.
origin 1
{
    x = 316;
    y = 0;

    child origin    // The score display
    {
        x = 0;
        y = 4;
        child digits
        {
            value_source = "SCORE";
            digits = 6;
        }
    }
}
We will display the score at the basic x co-ordinates, and add 4 to the y co-ordinate so there's a little bit of space between the top of the game screen and the score.
Next, we want to display the values for health and ammo just as far right, but down towards the bottom of the screen instead.
We will also modify the x co-ordinate to account for the size difference between the score (displaying 6 digits) and the health/ammo (displaying 3 digits each). The original Wolf3D number images are 8 pixels wide and there is a different of 3 digits, so we'll move these values 24 pixels across.
origin 1
{
    x = 316;
    y = 0;

    child origin // The score display
    {
        x = 0;
        y = 0;
        child digits
        {
            value_source = "SCORE";
            digits = 6;
        }
    }

    child origin // The health display
    {
        x = 24;
        y = 164;
        child digits
        {
            value_source = "HEALTH";
            digits = 3;
        }
    }
    child origin // The ammo display
    {
        x = 24;
        y = 180;
        child digits
        {
            value_source = "AMMO_PRIMARY";
            digits = 3;
        }
    }
}
This display is designed for a game being played at the maximum in-game screen size, so we'll need to add one more thing for that to look correct (as correct as it will look with current art assets, anyway).
Right at the bottom of the file, underneath the last closed bracket, you'll want to add the following line:
show_without_key = true;
By default, when LZWolf is played with the maximum display, the statusbar or HUD displays when the player holds down the TAB key. The show_without_key variable simply tells the game whether or not that should be ignored. By setting it to a value of true, the HUD will always display when playing the game.
With all of this put together, when you test your pk3, you should see something akin to the following (At maximum Screen Size)
The above example shows a way to rearrange the HUD in such a way that it mimics some of the things a modern game does. But as it is right now, it only displays some raw numbers. How will the player know what each number represents?
To improve on this, we'll add some visual elements.
First, we'll shift the whole HUD slightly to the left to give us some room. Luckily, that can be done by simply changing the value of x in origin 1. We'll change it to '288'.
origin 1
{
    x = 272;
    y = 0;

    child origin // The score display
    {
Now that there is room (We shifted the HUD 32 pixels to the left with the above change), we'll add some elements to display images alongside each part of the HUD.
We'll look at creating one for the score, first. We'll put the image elements above the other elements in the origin element, so they draw first.
origin 1
{
    x = 272;
    y = 0;

    child origin
    {
        x = 60;
        y = 22;
        child pic
        {
            graphic_source = "TEXNAME";
            texname = "CROSA0";
        }
    }
    child origin
    {
        x = 0;
        y = 4;
        child digits
        {
            value_source = "SCORE";
            digits = 6;
        }
    }
First, we define a new origin for the new child element. Unfortunately pic elements can't have their own x and y co-ordinates, so this is a necessary step. Then, we define the pic element that will display an image inside this new origin.
texname is capable of calling any images in the game - sprites as well as graphics. In this example we are telling the game to display the sprite for the Cross treasure item.
With this new inclusion, when you boot up your game, you should see something along these lines
Do the same thing for health and ammo, specifying their own x and y co-ordinates and image names (If you're modding Wolfenstein 3D, you can use "MEDIA0" for a medkit image, and "CLIPA0" for the ammo.
Given the above information it is encouraged to experiment and work it out yourself, but if needed the complete sbarprot for this HUD can be found below.
origin 1
{
    x = 272;
    y = 0;

    // Score image and display
    child origin
    {
        x = 60;
        y = 22;
        child pic
        {
            graphic_source = "TEXNAME";
            texname = "CROSA0";
        }
    }
    child origin
    {
        x = 0;
        y = 4;
        child digits
        {
            value_source = "SCORE";
            digits = 6;
        }
    }

    // Health image and display
    child origin
    {
        x = 60;
        y = 180;
        child pic
        {
            graphic_source = "TEXNAME";
            texname = "MEDIA0";
        }
    }
    child origin
    {
        x = 24;
        y = 164;
        child digits
        {
            value_source = "HEALTH";
            digits = 3;
        }
    }

    // Ammo image and display
    child origin
    {
        x = 60;
        y = 196;
        child pic
        {
            graphic_source = "TEXNAME";
            texname = "CLIPA0";
        }
    }
    child origin
    {
        x = 24;
        y = 180;
        child digits
        {
            value_source = "AMMO_PRIMARY";
            digits = 3;
        }
    }
}

show_without_key = true;
Of course, this is very basic and uses stock assets, so it only serves as a working example. With further customization and custom graphics, you can create all manor of different displays.
Here's an example from a project by Chiseled seeking to recreate Wolfenstein 2009:
Now that you have the basics for this HUD, why not add the current floor and player's lives to the HUD? Try creating a second main origin element to display them in.